Price:
US$31.67
Free Shipping
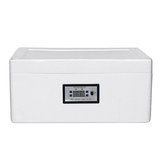
32 Eggs Automatic Incubator Digital Chicken Poultry Hatcher Temperature Control


Compatibility
To confirm that this part fits your vehicle, please enter your vehicle's details below.
-
Year:
Select
-
Make:
Select
-
Model:
Select
-
Submodel:
Select
-
Trim:
Select
-
Engine:
Select
- Clear All
This part is compatible with 0 vehicle(s).
Show all compatible vehicles
Show all compatible vehicles
This part is compatible with 1 vehicle(s) matching
This part is not compatible with
Recent searches
- Year
- Make
- Model
- Submodel
- Trim
- Engine
Specifications:
Material: Foam
Color: White
Voltage: AC 100-240V 50/60Hz
Rated Voltage: 12V
Power: 20W
Pattern: 32 Eggs
Size: (L)X(W)X(H) 36x24x19cm /14.17"x9.45"x7.48"(appr.)
Plug: US Plug(We will base on your country to send the corresponding adapter plug)
Features:
● Made of foam material, good insulation performance and uniform temperature.
● Suitable for breeding eggs of various sizes, low noise, and easy to use.
● Temperature controller with small temperature difference and high hatching rate.
● This is a semi-automatic incubator, which requires manually turning the egg.
● Copy the hen to incubate the body temperature.
Button Operation Instructions:
1. the temperature setting
Under the normal display state, short press "set" key, the screen flashing number is the current machine setting temperature, press "+" or "-" key to adjust to the required temperature, and then press "set" key, the machine will automatically save and exit the setting interface, jump back to display current temperature.
2. egg lighting operation
Short press the "lighting" button to illuminate the egg.
3. Alarm phenomenon
There will be an alarm phenomenon of drip during the incubation process. Pressing the decrease button will cancel the alarm, and according to the situation, properly heat or slightly open the quilt to cool down. (The display "H" is a high temperature alarm, and the display "L" is a low temperature alarm)
4. High temperature cooling
Power off for a few minutes, reply to the factory settings, find a wet towel (towel squeezed clean water) cover the temperature probe, put the egg on the towel, then cover the quilt, the quilt directly covers the mouth of the machine box
5. quickly restore the factory settings
Hold down the "+" and "-" keys together and do not raise your hand (about 5 seconds). The buzzer sounds and the screen flashes once to indicate that the control panel has successfully restored all factory default data (including previously calibrated temperatures).
How to use:
1. Boot test
2. Put the two water bags together (to prevent water leakage), then pour the cold water into the inner water bag, tiling the bottom of the box about 3-5 cm high, and the water bag mouth is fixed on the side of the box with a clip to avoid water leakage.
3. Put the temperature control probe on the upper surface of the water bag with tape, and let the probe fully touch the water bag (do not stick the top of the probe, only stick the wire)
4. Start testing the machine and put the egg after the temperature is stable.
5. The water bottle is filled with water and placed in the machine to keep the water temperature of the kettle consistent with the temperature of the eggs.
6. Put the eggs after disinfection and put them directly on the water bag
7. Put a small quilt on the top of the egg. If the temperature is low, the cotton quilt should be tightly closed. If the temperature is high, do not cover it too tightly.
8. Turning the eggs from the first day, every time you turn the eggs, large area spray warm water on the eggs, once in the morning and evening.
9. 7 days after hatching, you can find a warm place, turn off the lights at night to see if the eggs are bloodshot, the bloodshot is the fertilized egg can continue to hatch, the blood is uneven, the weak sperm, no bloodshot It is a sperm-free egg, a weak sperm egg and a sperm-free egg, which can be taken out directly.
10. When you are out of the shell, you don't need to turn the eggs. Spray warm water on the eggshell to make it easier to soften the shell.
Note: Do not cover airtight things, such as plastic cloth, etc., do not use when the original packaging foam cover
Note:
* Be sure to test whether the water bag leaks, otherwise it will lead to the risk of short circuit.
* Must ensure that the covered material is breathable and that there is enough oxygen in the incubator.
* Due to the longer the laying time of the eggs, the lower the fertilization rate, it is recommended to use fresh eggs within 7 days. (about 3 days in summer)
Package Included:
1 x Egg Incubator
1 x AC Adapter
2 x Clear Plastic Bag
1 x Mini Sprayer
1 x Clip
(excluding other decorations)
Instruction is not included. Please feel free to contact us if you have any questions. Hope a nice day!
Notice:
Please allow slight deviation of measurement due to manual measurement.
Due to different producing batches, product details might be a little different.
Due to different monitors and different light, the picture may not reflect the actual color of the item.
Please consider the actual sizes shown in the listing as the pictures are generally enlarged to show detail.